
How to Digitize Old Family Photos Before They Fade
Old family photos from South Asian homes are fading. Learn how to digitize, organize, and preserve them alongside voice stories in a family legacy book.
June 4, 2026 · 11 min read
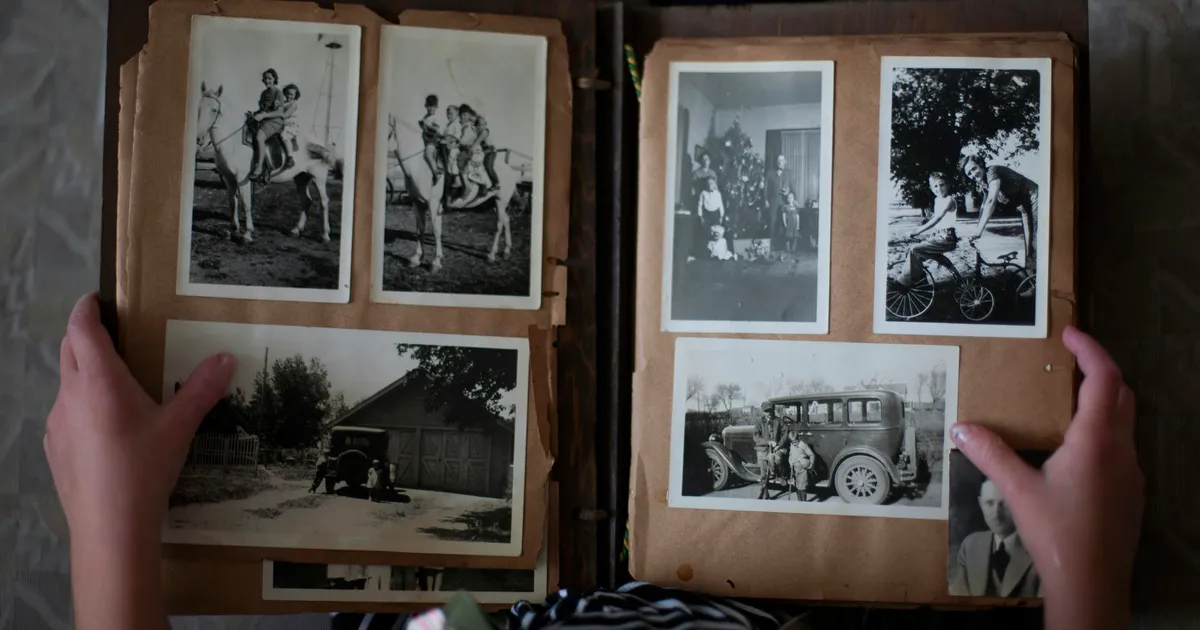
There is a box in your parents' closet. Inside: wedding portraits from Karachi, a passport photo from Lahore from the 1960s, a faded Polaroid of your grandparents standing outside their first home in London, a school photograph of your mother in a uniform you have never seen in person, and a group shot from an Eid gathering where nobody remembers everyone's names anymore.
These photographs are the visual backbone of your family's story. But they are also fading. The colors shift toward sepia. The edges curl. The faces become harder to recognize with each passing year. And unlike digital files, physical photographs do not have a backup.
For South Asian diaspora families, the urgency is doubled. Many of these photographs survived Partition, migration, multiple moves across continents, and decades stored in cardboard boxes under beds. They should not be lost now because no one took the time to digitize them.
This guide walks you through exactly how to digitize your family's old photographs, organize them so they are actually findable, and pair them with the stories that give them meaning.
Why Digitizing Old Photos Cannot Wait
Physical photographs are more fragile than most people realize. The paper degrades. The ink fades. The emulsion cracks. Humidity causes mold. Heat speeds up chemical deterioration. Light bleaches the image.
The photographs that survived the journey from South Asia to the diaspora are often already damaged. They were stored in non-archival albums, exposed to monsoon humidity before migration, folded into suitcases, or kept in attics and basements that fluctuated in temperature. Every year they sit undigitized, more detail is lost.
The Library of Congress recommends digitizing photographs before visible damage appears. Once fading, cracking, or mold becomes visible, some information is already gone forever. Digitization does not just create a convenient copy. It creates a preservation master that will outlast the original.
For families spread across continents, digitization also solves a practical problem. The family member who holds the physical album is usually the only one with access. When photographs are digitized, everyone can see them, regardless of where they live.
What You Need to Start Digitizing
You do not need expensive equipment to create high-quality digital copies of family photographs. Here is what works:
A Flatbed Scanner
A flatbed scanner is the best tool for digitizing prints. The Epson Perfection V39 is a reliable entry-level option that produces excellent results for standard photo prints. It scans at 600 DPI (dots per inch), which is sufficient for prints up to 8x10 inches. For higher volume, the Epson FastFoto series can scan a stack of photos automatically.
For negatives and slides, you need a scanner with a transparency adapter. The Epson Perfection V600 or V850 handles both prints and film. Scanning negatives requires higher resolution, typically 2400-4800 DPI, because the original image is much smaller and needs to be enlarged.
A Smartphone With a Good Camera
If you do not have a scanner, a modern smartphone camera can produce acceptable results. The key is consistency and lighting. Use natural daylight (not direct sun), hold the phone parallel to the photo, and avoid shadows. Apps like Google PhotoScan remove glare and correct perspective automatically.
Smartphone digitization is not as high quality as a flatbed scan, but it is infinitely better than doing nothing. Do not let perfect be the enemy of preserved.
Storage and Naming
Before you scan a single photo, decide how you will organize the files. A consistent naming convention saves hours of frustration later.
A simple system: YYYY-MM-DD_Description_###.tif
For example: 1965-03-14_Wedding-Day-Karachi_001.tif
This format keeps files in chronological order, includes enough description to identify the image, and uses a sequence number for multiple photos from the same event.
How to Scan: A Step-by-Step Workflow
Step 1: Sort Before You Scan
Go through the entire collection once before touching the scanner. Sort photos into rough groups by decade or by family branch. This helps you batch similar photos together and adjust scanner settings less frequently.
Set aside photos that need special attention: damaged images, very old prints, negatives, and slides.
Step 2: Clean the Photos Gently
Use a soft brush or compressed air to remove dust from the surface of each photo. Do not use liquids, wipes, or cleaning solutions on original prints. If a photo is very dirty, consult a conservator before attempting to clean it.
Clean the scanner glass between each batch to avoid transferring dust to the next set of photos.
Step 3: Scan at the Right Settings
For standard photo prints (4x6, 5x7, 8x10), scan at 600 DPI in color mode. Save as TIFF, not JPEG. TIFF is a lossless format that preserves every detail. JPEG compresses the image and discards information every time you save it.
For small prints or photos with fine detail (like group portraits where faces are small), scan at 1200 DPI.
For negatives and slides, scan at 2400-4800 DPI in color mode, again saving as TIFF.
The file sizes will be large. A single 600 DPI 4x6 photo in TIFF is about 25-30 MB. This is normal. Storage is cheap. Lost detail is permanent.
Step 4: Quality Check Every 20 Scans
Open each scan at 100% zoom and check that the focus is sharp, the colors are accurate, and nothing was cut off at the edges. Fix any issues before continuing.
Step 5: Name and Organize Immediately
Rename each file as you scan it, using your naming convention. Place it in the correct folder. Do not leave files with generic names like IMG_0001.tif in a single folder. That is how digital archives become unusable.
Organizing the Digital Archive
A folder of hundreds of scanned photos is only marginally better than a shoebox of physical ones. Organization is what makes the archive useful.
Folder Structure
Organize by decade, with subfolders for specific events or family branches:
`` Family_Archive/ 1920s/ 1930s/ 1940s/ Partition-1947/ Wedding-Parents-1948/ 1950s/ 1960s/ Karachi-1965/ Migration-London-1968/ 1970s/ ... ``
This structure makes it easy to find photos by time period. Within each folder, files sort by date automatically if you used the naming convention correctly.
Metadata and Captions
A filename tells you the date and a short description. It does not tell you who is in the photo, where exactly it was taken, or why it matters. That information belongs in metadata.
If you use Adobe Lightroom, Apple Photos, or DigiKam, you can embed captions, keywords, and locations directly into the file. This metadata travels with the photo, even if you move or share the file.
For each photo, add:
- Names of everyone visible (left to right is the standard)
- Approximate date and location
- The occasion or context
- The name of the photographer, if known
- Any story your elder told about this image
If adding metadata feels overwhelming, start with a simple spreadsheet. Columns: filename, date, location, people, occasion, notes. A spreadsheet is better than nothing, and you can migrate it to embedded metadata later.
The Qissa book format connects photos directly to the stories that give them context. When you pair a scanned photograph with a voice recording or written memory, the image stops being a standalone picture and becomes part of a living family narrative. You can see how photos and voice recordings sit together on Inside the Book.
Preserving the Originals After Digitization
Once you have high-quality digital copies, the physical originals are no longer the only record. But they remain irreplaceable. Store them properly.
Storage Conditions
Keep original photographs in archival-quality boxes or albums. Store them in a cool, dry, dark place. Avoid attics, basements, and garages. The ideal environment is 65-70 degrees Fahrenheit with 30-40% humidity.
Handling Guidelines
Handle prints by the edges. Wear cotton gloves for very old or valuable photographs. Never use paper clips, rubber bands, or adhesive tape on original photos.
What to Do With Damaged Photos
Do not throw away damaged photographs. Even a cracked, faded, or mold-damaged print may be restorable with AI tools. Services like ArtImageHub use GFPGAN and Real-ESRGAN to recover facial details and repair damage from scans of deteriorated originals.
The photograph that looks unsalvageable to you may be the only surviving image of a great-grandparent. Scan it at the highest resolution your scanner supports, then use restoration tools to recover what is there. What you see on screen after restoration may surprise you.
Pairing Photos With Family Stories
A digitized photo without context is a face without a name. The real value of a family photograph is unlocked when you know the story behind it.
Make a habit of sitting with an elder and going through scanned photos together. Record their reactions, their memories, and their corrections. You will discover that the family wedding you thought you knew had a detail nobody ever mentioned. The house in the background of a childhood photo was not the house anyone remembered. The person standing in the corner of the group shot was not a stranger but a cousin everyone had forgotten.
Record these conversations. The Qissa process is built for exactly this: you can collect voice notes from elders as they describe each photo, then pair those recordings with the images in a finished book. The result is an archive where every image has a voice attached. You can learn more about how this works on How It Works.
A practical approach for photo-story pairing:
- Start with 10 photos your elder recognizes immediately
- Ask one question per photo: "What do you remember about this day?"
- Record the answer as a voice note
- Label the recording with the photo filename
- Repeat weekly
Over a few months, you will have a rich archive of photos with accompanying stories, all organized and searchable.
Common Challenges and How to Handle Them
"I have hundreds of photos and do not know where to start"
Start with the most endangered photos first: the oldest ones, the ones already showing damage, and the ones that only one living person can identify. Everything else can wait.
"My family lives in three different countries, and the photos are scattered"
Coordinate through a shared cloud folder. Ask each family branch to scan their local collection and upload to the shared folder. Use the naming convention consistently so files merge cleanly.
"I do not know who is in most of these photos"
This is the most common challenge and the most urgent reason to digitize now. Share thumbnails with older family members via WhatsApp or email. Label everything as soon as someone identifies a face. What is obvious to your mother today will be a mystery to her grandchildren tomorrow.
If no one can identify a person, label the file honestly: Unknown-woman-Karachi-estimated-1950s.jpg. Future research may solve the mystery. An unlabeled file is a dead end.
"The photos are in an album and I do not want to take them out"
Scan the entire page as a single image. Then scan individual photos if the album construction allows. If the photos are glued in, leave them in place and work with what you can capture from the page.
"I do not have a scanner"
Use your phone. Google PhotoScan is free and produces good results. It is not archival quality, but it will preserve the image. Upgrade to a scanner when you can.
The Cost of Waiting
There is a shelf in every diaspora family where the photo albums sit. They get pulled out during visits. Someone says, "We should really scan these." And then the visit ends, the albums go back on the shelf, and another year passes.
The paper continues to age. The faces continue to fade. The last person who knows the names in the group portrait grows older.
Digitizing your family's photographs is not a weekend project. It is a preservation act that takes time, attention, and consistency. But the alternative is a box of unlabeled, deteriorating images that no future generation will be able to identify.
Start this weekend. Pick 10 photos. Scan them. Name them. Share them with someone who can identify the faces. Save the files in three places: your computer, an external drive, and cloud storage.
And when you are ready to turn those photos and their stories into something your family can hold and pass down, you can start a Qissa. The book pairs your family's photographs with voice recordings, bilingual stories, and the context that makes an image more than a picture. It turns a box of fading prints into a permanent legacy.
Learn more about how Qissa preserves family photos and stories together, or visit the FAQ if you have questions about the process.